Do you love vegetables and salad, but can’t plant a regular garden? A salad table might be the ideal solution for you.

Photo: Deposit Photos
What is a salad table?
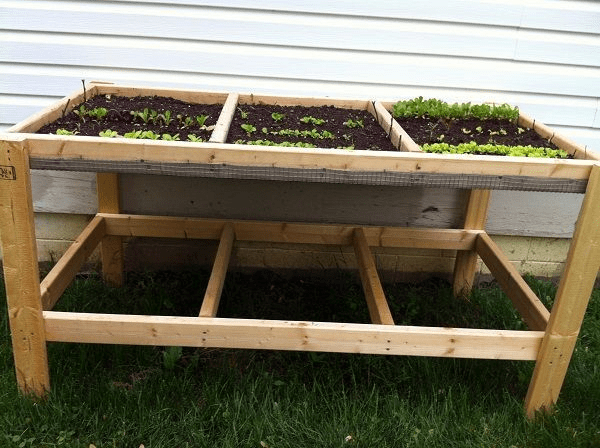
A salad table is a portable, waist-high table just deep enough to grow salad greens, herbs and other shallow-rooted plants and vegetables. The shallow wooden box frame has a large surface area and a mesh bottom that allows water to drain. You can attach legs to the box or set it on sawhorses.
The benefits of planting in a salad table are that you won’t have to kneel down to plant or harvest, weeds are unlikely, and rabbits and squirrels won’t as easily disturb your crop. If you don’t want to dig a garden or put in a raised bed (or if you’re a renter), a salad table will give you more options than container gardening. It can also be accessible for people in wheelchairs.
The salad table can be moved to a shadier area when the weather gets too hot for lettuce, so your plants won’t bolt as quickly. You can plant a second crop of lettuces and herbs by moving the table back into the sun when the weather is more temperate. The table will be heavy once you add soil, so you will need someone to help you move it; or add casters to the legs to make the table easier to drag in and out of the shade. Our table doesn’t have wheels. My husband and I can move it together, though we’ll probably ask our neighbor to help him if we need to move it very far because it is quite heavy.
Building the salad table
The table is easy to build with items you can pick up at the hardware store. My husband bought all of the materials for our salad table for about $60. Since we will be able to use it year after year, and it will make gardening easier for me, it’s worth the investment. He needed only a few hours in one afternoon to build a basic table without wheels; the construction only requires basic tools.
To build the basic table, he followed these step-by-step pictures and instructions by University of Maryland gardening expert Jon Traunfeld and added a few modifications.
The modifications were that he built a second frame (the same as the top) and bolted it to the legs to give us the option of adding removable boxes on the bottom. He will either build individual boxes using 1×4’s (this site has instructions) and line them with screening and hardware cloth like the upper frame, or we’ll buy shallow rectangular bins and punch drainage holes in the bottom to grow things on the bottom shelf.
We can grow shade tolerant plants in the bins below. The bins can be rotated to receive the various levels of natural light, or pulled out from the frame for a few hours to get some extra sunshine.
What to plant in the salad table
Once the table is built, you’ll need to determine a starting location before you fill it up with dirt and plants.
If you’re planting it in early spring, start in full sun and move the table to light shade in mid-to-late June (depending on how hot the temperature gets in your area). If you’re planting in late May or June, start in light shade, but you may have slower growth with plants that need full sun to start growing. If you are planting for a fall crop, the table should be moved back into full sun around mid-September.
Pick your spot in the yard based on the date, and fill the table with soil-less potting mix. You’ll have even better results by mixing in rich compost. We used 2 ½ large bags of organic potting mix to fill our table.
- Miracle-Gro Potting Mix feeds container plants for up to 6 months so you get more blooms for more color (vs. unfed plants)
- This potting soil Grows Plants Twice As Big! (vs. unfed plants)
- Where to Use: Use this home gardening product with all types of container plants, including annual and perennial flowers, vegetables, herbs and shrubs
Going beyond salad greens
I’m planting mostly salad greens and herbs in my salad table, though there are plenty of crops you can plant, including the following:
- Broccoli family — arugula, kale, mustard greens, cress, broccoli rabe, mizuna, kyona, komatsuna
- Beet family — spinach, chard, orach, beets
- Lettuce family — lettuces, endive, escarole, chicory
- Herbs
- Radishes
- Bush beans
If you’re doing a lot of one type of crop, as I am with salad greens, the best method is to space out when you plant to prevent your crops from being ready all at once. For successive planting like this, just start a new row or area every week or two to allow time to consume the crops as they are ready. It’s estimated that you can cut 1-2 pounds of salad greens at each cutting if all the plants are ready at one time. That’s a lot of salad!
How to start planting
Once you have your table filled and seeds ready, you can get started with the planting.
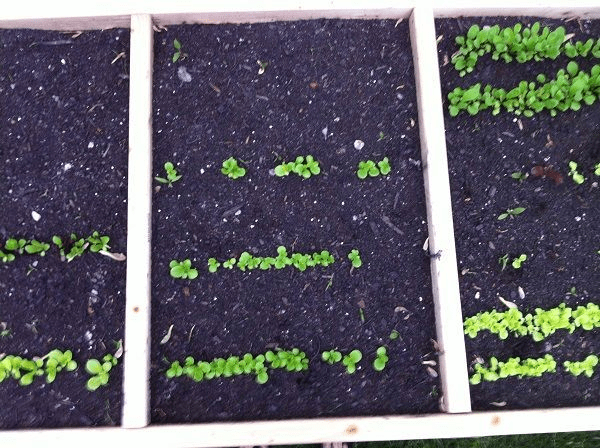
- Make shallow furrows using a ruler or stick across the length of a section spaced 4” – 5” apart.
- Sow seeds 1” apart in the row and then cover very lightly with potting mix.
- Water gently, but thoroughly. I used the gentlest setting on our hose nozzle, which is a mist. If you don’t have various settings on your hose nozzle, water with a sprinkle watering can so you don’t disturb the seeds. Water your salad table when the potting mix looks or feels dry, and every day once the plants are established and if the weather is warm and dry.
Within a week, you should start to see some green poking up through the soil. You may need to thin the plants to 1”-2” apart to allow them to grow to full size. Salad greens grow 4-6 inches in 25-40 days. Add your preferred fertilizer, if any, per instructions.
Harvest time
To harvest your salad greens, use the “cut and come again” method. Cut the plants down near the growing media and the plants will regenerate a second time. Once the greens have been cut a second time, pull them out (a third growing will be bitter), add soil, and plant more seeds for the next crop. For herbs, snip off as much as you need for that day until the plants become spindly or bolt, at which time you can pull them out and replant the area.
Once your growing season is over, you can cover or store your salad table to protect it from the elements. If you don’t remove the soil from the table before storing, mix in plenty of rich compost and new potting mix in the spring to ensure your next crop will have plenty of fresh nutrients.
While you probably won’t be able to fulfill all of your vegetable needs with a salad table, you’ll be able to save plenty of money on salad greens and herbs during the entire growing season and have control over whether your crops are organic or treated in any way.
If you liked this article, you might also like:
- New ways to use old sweaters
- Uses for old pantyhose
- Make your own dryer balls
- Cheap and easy DIY projects
- Should you buy a used lawn mower?


